深入理解glibc barrier的实现原理
深入理解glibc barrier的实现原理
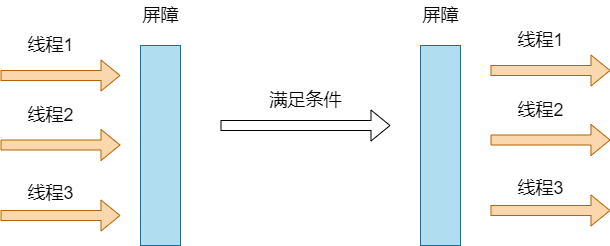
在多线程的同步方式中,屏障可以协调多个线程,使其同时停止在某一个点,然后再统一运行,其效果如下所示:

glibc中pthread_barrier_wait实现了该功能。
#include <pthread.h>
    int pthread_barrier_wait(pthread_barrier_t *barrier)
本文将从pthread_barrier_wait出发,讲解其背后的实现原理。
pthread_barrier_t的结构
pthread_barrier_t的结构定义在sysdeps/nptl/bits/pthreadtypes.h中,是一个联合体。联合体中有两个字段,第一个字段是char类型的数组。
typedef union
{
  char __size[__SIZEOF_PTHREAD_BARRIER_T];
  long int __align;
} pthread_barrier_t;
这个char数组各bit的定义在另一个结构体pthread_barrier中,定义在sysdeps/nptl/internaltypes.h。
这个才是barrier的真实定义,其有用5个字段。
struct pthread_barrier
{
  unsigned int in;
  unsigned int current_round;
  unsigned int count;
  int shared;
  unsigned int out;
};
每个字段的含义如下所示:
in:已经抵达barrier的线程数量。
current_round:当前这轮的基数。由于barrier是可以重复使用的,例如一个屏障可以允许2个线程通过,当这个2个线程达到该屏障之后,该屏障可以继续工作,重复使用。
count:每一轮需要抵达barrier的线程数量。
shared: 是否在多进程间使用。
out: 出屏障的线程总和。
current_round是比较难理解的字段,需要注意的是屏障是可以多次使用的,一批线程抵达屏障再一起出屏障之后,下一批线程又可以抵达屏障再一起出屏障。 current_round和这个相关,下面在源码解读中对其进行深入解读。
pthread_barrier_wait源码分析
首先,pthread_barrier_wait函数将进入屏障的线程数字段(bar->in)加1,变量i存储的就是加1后的值。注意这里使用的是acq_rel的内存序,因为下面将要根据i进行if-else判断,这里不能乱序。
除此以外,count值也读取了进来。
  struct pthread_barrier *bar = (struct pthread_barrier *) barrier;

  unsigned int i;

 reset_restart:

  i = atomic_fetch_add_acq_rel (&bar->in, 1) + 1;
  unsigned int count = bar->count;
下面这一段是用于处理IN值超过最大限制的场景。因为barrier是可以重复使用的,比如设置count为2,则可以第一轮限制2个线程通过, 第二轮还可以限制2个线程通过,依此类推。这个过程中,bar->in字段是不断递增的,因此可能存在溢出的场景。如果溢出了话,调用futex_wait进行等待,因为其他线程会有reset的操作,在pthread_barrier_wait的最后。
     unsigned int max_in_before_reset = BARRIER_IN_THRESHOLD
				   - BARRIER_IN_THRESHOLD % count;

    if (i > max_in_before_reset)
    {
        while (i > max_in_before_reset)
        {
            futex_wait_simple (&bar->in, i, bar->shared);
            i = atomic_load_relaxed (&bar->in);
        }
        goto reset_restart;
    }
接下来,读取当前这一轮的基础,如果i > cr + count,意味着已经有足够多的线程抵达了barrier,该线程不用wait,且需要将之前的waiter唤醒。注意futex_wake的第二参数是INT_MAX,代表会将所有的waiter都唤醒。
    unsigned cr = atomic_load_relaxed (&bar->current_round);
    while (cr + count <= i)
    {
        unsigned int newcr = i - i % count;
        if (atomic_compare_exchange_weak_release (&bar->current_round, &cr,
						newcr))
        {
            cr = newcr;
            futex_wake (&bar->current_round, INT_MAX, bar->shared);
            if (i <= cr)
                goto ready_to_leave;
            else
                break;
        }
    }
与上面的code对应,这段就代表还没有足够的线程进入barrier,因此调用futex_wait进行等待。
    while (i > cr)
    {
        futex_wait_simple (&bar->current_round, cr, bar->shared);
        cr = atomic_load_relaxed (&bar->current_round);
    }
程序的最后,要处理以下之前提到的"溢出"问题。当out值达到了阈值,则将current_round,out和in都置0。相当于reset操作,reset之后,barrier就和刚刚调用pthread_barrier_init时的状态相同了。
    o = atomic_fetch_add_release (&bar->out, 1) + 1;
    if (o == max_in_before_reset)
    {
        atomic_thread_fence_acquire ();
        atomic_store_relaxed (&bar->current_round, 0);
        atomic_store_relaxed (&bar->out, 0);

        int shared = bar->shared;
        atomic_store_release (&bar->in, 0);
        futex_wake (&bar->in, INT_MAX, shared);
    }
gdb观察条件变量的内部值的变化
//g++ test.cpp -g
#include <stdio.h>
#include <pthread.h>
#include <stdlib.h>
#include <unistd.h>
int a=0;

pthread_mutex_t numlock;
pthread_barrier_t b;

struct pthread_barrier
{
  unsigned int in;
  unsigned int current_round;
  unsigned int count;
  int shared;
  unsigned int out;
};

pthread_barrier *b_real = NULL;

void* handle(void *data)
{
    while(1)
    {
        pthread_mutex_lock(&numlock);
        a++;
        pthread_mutex_unlock(&numlock);
        printf("thread enter wait point\n");
        pthread_barrier_wait(&b);
        sleep(1);
    }
    return 0;
}


int main()
{
    pthread_t t1,t2;
    pthread_barrier_init(&b,NULL,2); //初始化屏障
    b_real = (pthread_barrier *)&b;
    pthread_mutex_init(&numlock,NULL);
    pthread_create(&t1,NULL,handle,NULL);
    pthread_create(&t2,NULL,handle,NULL);
    pthread_join(t1, NULL);
    pthread_join(t2, NULL);

    exit(0);
}
准备阶段
在调试该程序之前,为了更好的观察运行的过程,可以安装glibc的debuginfo。
本人的虚拟环境如下所示:
[root@localhost test4]# cat /etc/redhat-release
Rocky Linux release 9.2 (Blue Onyx)
其debuginfo可以在下面的地址中下载https://dl.rockylinux.org/stg/rocky/9.2/devel/x86_64/debug/tree/Packages/g/。找到下面这两项,将其下载到虚拟环境中,使用yum install安装。
glibc-debuginfo-2.34-60.el9.x86_64.rpm
glibc-debugsource-2.34-60.el9.x86_64.rpm
有了debuginfo后,就可以进入到glibc的源码中进行调试。
跟踪运行-第一轮
在pthread_barrier_wait方法上下一个断点,在代码中是31行,运行代码。
[root@localhost test4]# gdb a.out -q
Reading symbols from a.out...
(gdb) b test.cpp:31
Breakpoint 1 at 0x401223: file test.cpp, line 31.
(gdb) r
Starting program: /home/work/cpp_proj/test4/a.out
[Thread debugging using libthread_db enabled]
Using host libthread_db library "/lib64/libthread_db.so.1".
[New Thread 0x7ffff77ff640 (LWP 72128)]
[New Thread 0x7ffff6ffe640 (LWP 72129)]
in = 0
thread enter wait point
in = 0
thread enter wait point
[Switching to Thread 0x7ffff77ff640 (LWP 72128)]

Thread 2 "a.out" hit Breakpoint 1, handle (data=0x0) at test.cpp:31
31              pthread_barrier_wait(&b);
Missing separate debuginfos, use: dnf debuginfo-install libgcc-11.3.1-4.3.el9.x86_64 libstdc++-11.3.1-4.3.el9.x86_64
从运行的结果看,目前线程2执行到了pthread_barrier_wait(&b)这一句。
这个时候再pthread_barrier_wait.c的111行下一个断点,其内容就是对in变量+1的。
i = atomic_fetch_add_acq_rel (&bar->in, 1) + 1;
在这里下断点的目的就是更好的跟踪pthread_barrier的内部值的变化。同时为了避免多线程同时运行造成的影响,我们暂时关闭多线程同时运行。使用set scheduler-locking on可以实现这一点。
经过这个操作之后,使用next,单步调试,发现程序运行到了 i = atomic_fetch_add_acq_rel (&bar->in, 1) + 1;这一句。再使用next进行单步,这个时候打印bar变量的值。发现其in的值改成了1。这符合我们的预期,因为每有一个线程进入屏障,in值都应该+1。
(gdb) b pthread_barrier_wait.c:111
Breakpoint 2 at 0x7ffff789da90: file pthread_barrier_wait.c, line 111.
(gdb) info thread
  Id   Target Id                                 Frame
  1    Thread 0x7ffff7ec4180 (LWP 72124) "a.out" __futex_abstimed_wait_common64 (private=128, cancel=true, abstime=0x0,
    op=265, expected=72128, futex_word=0x7ffff77ff910) at futex-internal.c:57
* 2    Thread 0x7ffff77ff640 (LWP 72128) "a.out" handle (data=0x0) at test.cpp:31
  3    Thread 0x7ffff6ffe640 (LWP 72129) "a.out" handle (data=0x0) at test.cpp:31
(gdb) set scheduler-locking on
(gdb) n

Thread 2 "a.out" hit Breakpoint 2, ___pthread_barrier_wait (barrier=0x404100 <b>) at pthread_barrier_wait.c:111
111       i = atomic_fetch_add_acq_rel (&bar->in, 1) + 1;
(gdb) n
117       unsigned int max_in_before_reset = BARRIER_IN_THRESHOLD
(gdb) p *bar
$1 = {in = 1, current_round = 0, count = 2, shared = 0, out = 0}
接着,我们重新允许多线程同时运行,使用set scheduler-locking off可以做到这一点。使用continue继续运行,这里再次停在了i = atomic_fetch_add_acq_rel (&bar->in, 1) + 1;这一句上,继续next,然后打印bar变量,可以发现,到目前为止in的值为2。也是符合预期的。
(gdb) set scheduler-locking off
(gdb) c
Continuing.
[Switching to Thread 0x7ffff6ffe640 (LWP 72129)]

Thread 3 "a.out" hit Breakpoint 1, handle (data=0x0) at test.cpp:31
31              pthread_barrier_wait(&b);
(gdb) n

Thread 3 "a.out" hit Breakpoint 2, ___pthread_barrier_wait (barrier=0x404100 <b>) at pthread_barrier_wait.c:111
111       i = atomic_fetch_add_acq_rel (&bar->in, 1) + 1;
(gdb) n
117       unsigned int max_in_before_reset = BARRIER_IN_THRESHOLD
(gdb) p *bar
$2 = {in = 2, current_round = 0, count = 2, shared = 0, out = 0}
此时in = current_round + count,因此满足出屏障条件,下面可以出屏障继续执行。
跟踪调试-第二轮
使用continue,两个线程便进入了第二轮进入屏障的过程。
这里重新设置只运行单线程运行。线程3停在了i = atomic_fetch_add_acq_rel (&bar->in, 1) + 1;上。打印bar变量的值,可以看到此时in = 3,因为这是历史上第三个进入屏障的线程。
current_round代表在此轮之前,所有进入的线程总数,因此等于2。out代表所有出了屏障的线程总数,其值应该等于current_round,也等于2。
(gdb) c
Continuing.
in = 2
thread enter wait point
in = 2
thread enter wait point

Thread 3 "a.out" hit Breakpoint 1, handle (data=0x0) at test.cpp:31
31              pthread_barrier_wait(&b);
(gdb) set scheduler-locking on
(gdb) n

Thread 3 "a.out" hit Breakpoint 2, ___pthread_barrier_wait (barrier=0x404100 <b>) at pthread_barrier_wait.c:111
111       i = atomic_fetch_add_acq_rel (&bar->in, 1) + 1;
(gdb) n
117       unsigned int max_in_before_reset = BARRIER_IN_THRESHOLD
(gdb) p *bar
$3 = {in = 3, current_round = 2, count = 2, shared = 0, out = 2}
接下来,关闭多线程锁定,使用continue继续执行。此时线程2停在了i = atomic_fetch_add_acq_rel (&bar->in, 1) + 1;上。打印bar的值发现in = 4。
此时in = current_round + count,因此满足出屏障条件,下面可以出屏障继续执行。
(gdb) set scheduler-locking off
(gdb) c
Continuing.
[Switching to Thread 0x7ffff77ff640 (LWP 72128)]

Thread 2 "a.out" hit Breakpoint 1, handle (data=0x0) at test.cpp:31
31              pthread_barrier_wait(&b);
(gdb) n

Thread 2 "a.out" hit Breakpoint 2, ___pthread_barrier_wait (barrier=0x404100 <b>) at pthread_barrier_wait.c:111
111       i = atomic_fetch_add_acq_rel (&bar->in, 1) + 1;
(gdb) n
117       unsigned int max_in_before_reset = BARRIER_IN_THRESHOLD
(gdb) p *bar
$4 = {in = 4, current_round = 2, count = 2, shared = 0, out = 2}
总结
在源码面前,所有的问题都是非常清晰的。本文通过分析pthread_barrier_wait.c的源码,了解了屏障可以使得一批线程同时等待在一个点,并同时运行的原理。 屏障是可以被重复使用的,使用了in,current_round,count三个变量实现了这个点。
在案例分析中,安装了glibc的debuginfo,跟踪了其中的内部变量的值的变化,验证了之前源码的分析。